 By Alexis Grace
Embarking on a bathroom remodel is one of the most rewarding investments you can make in your home. Ranging from updating dated tile to swapping out tired fixtures, the process breathes new life into a heavily used space and dramatically increases property value. However, beneath the gleaming new porcelain and stylish brushed nickel hardware lies a complex web of supply lines, drain pipes, and vent stacks. Rushing into a renovation without fully understanding the underlying plumbing mechanics often leads to catastrophic errors that turn a dream project into an expensive nightmare.
Remodeling mistakes in the bathroom do not always reveal themselves immediately. A poorly sloped shower drain or an improperly vented sink might function adequately for the first few weeks, only to cause slow backups, sewer gas leaks, or water damage months down the line. Avoiding these common pitfalls requires careful planning, adherence to building codes, and a respectful approach to the intricate systems keeping your home dry and functional.
1. Ignoring Vent Stack Requirements
One of the most dangerous and frequent mistakes DIY remodelers and inexperienced contractors make is neglecting the plumbing vent system. Every fixture in your bathroom requires a vent pipe that extends up through the roof. This vent serves a vital purpose by allowing air to enter the drainage system, which equalizes pressure and ensures wastewater flows smoothly down the stack without creating a vacuum.
When you relocate a toilet, sink, or shower during a remodel, you alter the delicate balance of the venting network. Failing to tie new fixtures into an adequate vent stack leads to severe functional issues:
-
Gurgling Drains: As water rushes down a drain without proper airflow, it pulls air through nearby traps, creating a distinct gurgling sound.
-
Slow Drainage: Without air pressure balancing the pipes, wastewater crawls sluggishly through the lines, increasing the likelihood of clogs.
-
Sewer Gas Leaks: If negative pressure pulls water completely out of a fixture trap, toxic and foul-smelling sewer gases vent directly into your newly remodeled bathroom.
Always consult a licensed plumber or local building codes before moving fixtures to ensure your layout maintains proper venting compliance.
2. Incorrect Slope for Shower and Sink Drains
Gravity is the absolute engine driving your home drainage system. If wastewater does not have a consistent downward slope toward the main sewer line, it will eventually stall, collect debris, and cause major backups. A common mistake during bathroom remodeling is laying drain pipes too flat or, conversely, pitching them too steeply.
Building codes universally require horizontal drainage pipes with a diameter of two or three inches to maintain a specific downward grade, typically one-quarter inch of drop for every foot of horizontal run. If the slope is too flat, water rushes past solid waste, leaving sludge behind to harden in the pipes. If the slope is too steep, the liquid water rushes away too quickly, leaving heavy solid waste stranded behind in the empty pipe. Getting this angle precisely right during subfloor modifications is non-negotiable for a lasting remodel.
3. Forgetting to Install Shut-Off Valves for Every Fixture
When a supply line bursts or a faucet cartridge fails, the first thing you need to do is shut off the water supply to that specific fixture without cutting off water to the entire house. Unfortunately, budget-conscious or rushed remodelers sometimes skip installing individual shut-off valves beneath sinks or behind toilets, relying instead on the main home water shut-off valve.
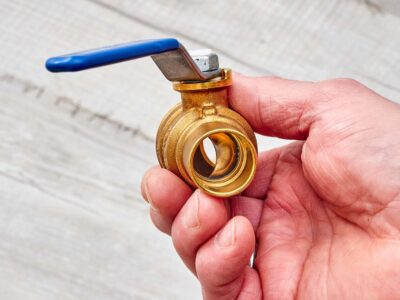
Every single fixture—including sinks, toilets, bidets, and freestanding bathtubs—deserves its own dedicated quarter-turn ball valve. Modern quarter-turn valves offer superior reliability compared to older multi-turn stem valves that frequently seize up over time. Installing accessible shut-off valves during your remodel ensures that routine maintenance or emergency repairs take minutes instead of hours.
4. Underestimating Waterproofing Behind Tile Surrounds
A stunning custom tile shower or bathtub surround is often the visual centerpiece of a modern bathroom remodel. However, tile and grout are inherently porous materials, meaning they are water-resistant rather than waterproof. Relying solely on cement board and tile to keep moisture out of your wall framing is a recipe for silent rot and black mold.
Achieving a waterproof wet area requires a multi-layered approach that must be executed meticulously before a single tile is set:
-
Waterproof Membranes: Apply a liquid waterproofing membrane or a sheet-applied waterproofing system over the entire cement backer board surface in the shower enclosure.
-
Sealing Penetrations: Pay special attention to mixing valve cutouts, shower arm pipes, and niche corners, reinforcing them with waterproof sealant tape.
-
Proper Pan Liners: Ensure the shower pan features a sloped pre-bed, a tested PVC or copper liner, and a secondary weep hole protection layer to prevent water from pooling under the tile bed.
Cutting corners on waterproofing during a remodel guarantees that moisture will eventually migrate into structural studs, ruining your expensive finishes within a couple of years.
5. Failing to Verify Pipe Sizing and Water Pressure
Replacing a standard builder-grade showerhead with a luxurious multi-head body spray system or a massive rainfall shower panel feels like a major upgrade. However, if you do not verify that your existing supply pipes can handle the increased volume, your luxury shower will turn into a disappointing trickle.
Older homes often feature half-inch supply lines that provide adequate flow for standard fixtures, but high-demand spa setups require three-quarter-inch supply mains to maintain proper water pressure and volume. Additionally, changing from gravity-fed systems or modifying manifold locations can impact pressure dynamics. Always calculate your peak water demand and upgrade your supply pipe diameter before finishing the walls if you plan to install high-flow fixtures.
Frequently Asked Questions
Can I install a toilet anywhere in the bathroom during a remodel?
You can relocate a toilet within a room, but you are strictly limited by the location and size of the main three-inch or four-inch vertical drain stack. Moving a toilet far from the stack requires running a new drain pipe through the floor joists while maintaining the correct downward slope, which may require sistering joists or building up the floor height.
What is the best material to use for new supply lines during a remodel?
Cross-linked polyethylene, commonly known as Pex, has largely replaced rigid copper for residential supply lines due to its flexibility, resistance to freezing temperatures, and fewer required joints. Pex tubing speeds up installation time and reduces the risk of joint leaks behind finished walls.
Do I need a building permit to remodel my bathroom plumbing?
Most municipalities require a plumbing permit for any project that involves moving, adding, or altering supply lines, drain pipes, or vent stacks. Pulling a permit ensures that an inspector reviews the work to guarantee it meets local safety codes, which protects your investment and prevents issues when selling your home.
How do I prevent water hammer in newly installed bathroom pipes?
Water hammer occurs when fast-flowing water slams to a halt when a valve closes, creating a loud banging noise and shockwave in the pipes. You can prevent this by securely strapping supply pipes to framing members and installing water hammer arrestors—small air-cushioned chambers—near quick-closing valves like those on washing machines or modern electronic faucets.
Can I mix different metal types in my new plumbing fittings?
Mixing certain dissimilar metals, such as copper and galvanized steel, directly together causes galvanic corrosion due to an electrochemical reaction between the metals. If you must transition between different pipe materials, always use a certified dielectric union or brass connector to prevent direct metal-to-metal contact and premature pipe failure.
What is the most common cause of shower pan leaks after a remodel?
The most frequent cause of shower pan failure is a blocked or clogged weep hole in the drain assembly. When weep holes—the small drainage channels around the drain strainer—become clogged with mortar or thinset during tile installation, water trapped beneath the tile cannot drain out and instead saturates the subfloor.
How much clearance do I need around a new toilet and vanity?
National building codes require a minimum of thirty inches of clear space centered on the toilet, with at least twenty-four inches of unobstructed clearance in front of the bowl. For bathroom vanities, ensure at least twenty-four to thirty inches of clear space in front of the cabinet doors and drawers to allow comfortable movement and functional use.